Request Newsletter

Request a Newsletter at pelicancraftslongbeach@gmail.com
Showing posts with label Belly Band. Show all posts

Saturday, August 30, 2025

Junk Journal/Memory Book Class

Junk Journal/Memory Book Class 

(Start to Finish)

Gulf Coast Scrap-A-Palooza -- October 23, 24, 25, 2025

Scrap-A-Palooza is just around the corner and I am, for one, counting down the days to be with my scrapbooking friends.  Thanks Robyn and Megan for hosting this great event!

NOTE:  THIS IS A LONG POST

Diana and I will be holding a Junk Journal/Memory Book Class for anyone who wishes to come (limited seating for 15 participants).  A Junk Journal originally was just that -- a journal made from junk lying around your home -- old envelopes, flyers, old book pages, magazine pages, if you can imagine it, it was probably used.  In this class we will be using new items -- several different types of papers (various notebook papers, doilies, etc.) to create the pages. After the cover and pages are created, we will "sew" them into the cover and decorate them with ephemera. At the end of the third class you will have a completed Junk Journal/Memory book to record your memories of trips, events or your personal thoughts.

A flyer was posted on Friday, August 29th about the class and we hope to see you there.  The flyer is below with some explanations to go along with it.  Have a great day!


This is a three-session class to be held over three days.  A list of items each participant needs to bring and a list of what is provided in the class are shown below. COST:  $20 per day or $50 for all three sessions.

Day 1 -- Thursday, October 23rd at 3:00 p.m.:  Each participant will receive a cardboard box that has been cut down to journal size.  Each participant will need to bring two sheets of coordinating 12"x12" scrapbook paper of their choice to cover the "journal" inside and out. 


Day 2 -- Friday, October 24th at 7:00 p.m.:  Each participant will receive numerous papers to create the SIGNATURES for the journal.  A SIGNATURE is a group of papers sewn into the journal (resembling a small booklet). Each participant will be creating three signatures for their journal.  After the signatures are created, everyone will be shown how to "sew" them into the cover for the journal.  All materials for "sewing" the signatures in will be provided. NOTE:  This will most likely be the longest class.


Day 3 -- Saturday, October 25th at 1:00 p.m.:  Each participant will receive a stash of materials to make ephemera -- pockets, tags, belly bands, tucks, journal cards, etc.  If you would like to have coordinating pockets for the inside of journal, please bring additional sheets of coordinating cardstock.  Bring coordinating card stock if you want to make additional tags.  A Big Shot and Dies will be available to cut out additional pockets and tags.


REMEMBER:  Many of the items you make can be used in your scrapbooking!

Each participants' journal will be the same, but different.  Papers may be placed differently by each individual and decorated differently with ephemera.

ITEMS EACH PARTICIPANT needs to bring:

Paper Cutter        Bone Folder        Liquid Glue        Scissors 

Ruler         Pictures      Stapler       Two-sided tape (if desired)             

Pen and paper for notes                  Stickers (if desired

Markers (any type) / Colored Pencils etc. to color neutral ephemera (if desired)

Ribbon:  1/4" x 12" (used as a page marker)             

Lace, Ribbon, Sari Cloth (your choice of materials): 24" to 30" (to be used to tie around the completed journal to keep it closed -- in case you create a chunky monkey or alligator mouth journal).

An old book as large as you can find (Dollar Tree, Dollar General, Library, ????) to be used when you staple and/or use as a glue book to keep your table top clean.

Scraps of lace, ribbon, string, buttons, stickers to use to decorate any ephemera you made.

2 (TWO) sheets of coordinating patterned paper (scrapbook paper) to make the cover and finish the inside of the cover.

Additional coordinating patterned paper if you wish to make additional pockets, etc., to match the cover.

EPHEMERA (e - fem - er - a) -- The third day is devoted to making/creating ephemera. Tags, pockets, tucks, belly bands, journal cards, etc., to place throughout your journal.  Ephemera can be decorated with lace, buttons, bulb pins and more.

ITEMS PROVIDED to each participant:

Pencil Box (to hold tools)        Pokey Tool             Needle

Waxed Thread                          Awl                         Clamps

Cut cardboard to create journal cover                    

Papers to create THREE signatures

"STUFF" to create Ephemera (some bits and pieces of ribbon and lace, book pages, playing cards, tags, pockets and more)

An INFORMATION PACKET of "nice to have/know" information.

Please leave a comment below if you want to attend the class and send an email to pelicancraftslongbeach@gmail.com with your information. Payment is due no later than date of class.

Monday, June 17, 2024

Master Board using the Spring Collection Digital Kit by Paperomia

When you craft, do you end up with a pile of scraps?  I know I do.  I save these scraps, yes even the small ones, and I create master boards with them.

What is a master board?   A master board is a collage of images.  These images can be random or they can be created using one subject.  It is totally up to you and what look you are trying to achieve. 

What size is it?  It can be any size you want. Most are made using 8-1/2x11 or 12x12 inch piece of paper or light cardboard.

How do you do it?  You take your pile of paper scraps and pick out a piece randomly and glue it to the base (cardboard). Keep doing this until the base is completely covered.  You can go back and add random pieces of ephemera if you choose.

What do you do with it?  You can cut a master board down to create pockets, tags, bookmarks, belly bands, card fronts -- just about anything your creative mind can come up with.

How do I cut it down?  There are two methods.  You can have the design facing up and you can pick and choose what images you want on which piece of ephemera. Or, you can turn the blank side up and cut-a-way creating those tags, pockets, etc. and be pleasantly surprised by how they look when you turn them over.  It is all how YOU want to do it.  There is no right or wrong way.

Shown below is the last master board I made using the scraps left over from projects I made out of the Spring Collection Digital Kit by Paperomia.


I have created a video on how I cut this master board into a belly band, several pockets and tags.  I hope you enjoy it. Please leave me a message and let me know what you think.


Sunday, May 26, 2024

Junk Journaling meets Scrapbooking

Hello everyone.  As most of you have guessed, I enjoy junk journaling and I enjoy scrapbooking, so I combined the two in this month's Paperomia Design Team project.

Here is the video of my two-page scrapbook layout, with details following:


Page 1 of 2


Page 2 of 2


SUPPLIES:

Pastel Mauve Digital Kit from Paperomia
Very Vanilla, Garden Green and Moody Mauve Cardstock from Stampin'Up!
Big Shot Die Cutting Machine with assorted dies (alphabet, oval from Stampin'Up! retired and 
             Wildflower dies from Tim Holtz)
Foam Adhesive Strips from Stampin'Up!
Simply Scored Scoring Tool from Stampin'Up!                   Circle Punch
Ruler                                     Papercutter                              Scissors
Lined Paper
 
DIRECTIONS:    *Please note your dimensions may be different depending on what size you print.

Print Pastel Mauve Digital Kit to the size(s) you need.

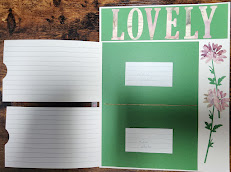
Page 1

Title Bar was cut 2-1/4" x 8-1/4" from Garden Green Cardstock.
Lovely was cut from Pastel Mauve Digital Kit Paper with Alphabet Dies and glued to Title Bar.

Cut 6-5/8" x 8-5/8" piece from Garden Green Cardstock.
Cut 2 - 4" x 7" pieces of cardstock printed from the Pastel Mauve Digital Kit.
   Score each 4" x 7" pieces of cardstock at 1/2", fold, glue 1/2" side to the back of the 6-5/8" x 8-5/8" 
   piece of Garden Green Cardstock, one piece at the top and one piece at the bottom after gluing
   lined paper to the back (second picture for Page 1). A 4" x 6" photograph will fit under each "flap."

Die cut two flowers from the Wildflower Die Set from Tim Holtz from Garden Green Cardstock and 
   two of the same flower from Pastel Mauve Digital Kit Papers. Trim the flower from the stem and
   glue to the green flower. 

Page 2

Title Bar was cut 2-1/4" x 8-1/4" from Garden Green Cardstock.
Memories was cut from Pastel Mauve Digital Kit Paper with Alphabet Dies and glued to Title Bar.

Cut 1-7/" x 8" from Garden Green Cardstock for the Belly Band; and, 
Cut out 3 small prints from the Pastel Mauve Digital Kit and glue to Belly Band.
Cut two small pieces from Foam Adhesive Strip and attach to back of Belly Band, attach.

Cut 6" x 10-1/2" from Moody Mauve Cardstock, score at 3-1/2" and 7". Fold accordian style.
Fussy Cut desired image from Pastel Mauve Digital Kit and glue to front of accordian journal.
Fussy Cut second desired image from Pastel Mauve Digital Kit and partially glue to the inside of the
   accordian journal (glue along the bottom, the middle and upper flowers) leaving space to insert
   small journal cards.  You have created two pockets on the inside.
Cut four to six small prints and insert into above pockets.

Cut 3" x 4" rectangle from Pastel Mauve Digital Kit for pocket. Score both sides and bottom at 1/4". 
   Fold along score lines. Using circle punch, punch "divit" on top edge of pocket.
Cut 1-7/8" x 5" rectangle from Garden Green Cardstock.
Cut 1-5/8" x 4-3/4" rectangle from Very Vanilla Cardstock, glue to Garden Green rectangle.
Cut 1-3/8" x 4-1/2" desired image from Pastel Mauve Digital Kit, layer on Very Vanilla Cardstock.
Cut 1-5/8" x 4-3/8" piece of lined paper and glue to back of tag.
Punch hole in tag and insert ribbon.

Cut 5-1/2" x 6-1/2" piece of lined paper and glue to back of accordian journal (last picture). Decorate
   as you wish.  Slip under belly band.

Cut 2 - 2-3/4" x 3-3/4" pieces of Garden Green Cardstock.
Cut 2 - 2-1/2" x 3-1/2" images from Pastel Mauve Digital Kit, cut out center using oval or rectangle
   dies. Apply glue to the top, left side and bottom and attach to above rectangle, leaving right side
   open to insert photograph.
Cut Foam Adhesive Strip to go around the sides and bottom of each Garden Green rectangle. Attach
   to scrapbook page, leaving tops open to insert tickets or other ephemera you may have.

I will be giving away a set of pockets on June 2, 2024 to an individual that makes a comment.  Please be sure when you leave a comment to include your e-mail address. Good Luck on winning!

Brenda 


Junk Journal/Memory Book Class

Junk Journal/Memory Book Class  (Start to Finish) Gulf Coast Scrap-A-Palooza -- October 23, 24, 25, 2025 Scrap-A-Palooza is just around the ...