Hello everyone. As most of you have guessed, I enjoy junk journaling and I enjoy scrapbooking, so I combined the two in this month's Paperomia Design Team project.
Here is the video of my two-page scrapbook layout, with details following:
Page 1 of 2
Page 2 of 2
SUPPLIES:
Pastel Mauve Digital Kit from Paperomia
Very Vanilla, Garden Green and Moody Mauve Cardstock from Stampin'Up!
Big Shot Die Cutting Machine with assorted dies (alphabet, oval from Stampin'Up! retired and
Wildflower dies from Tim Holtz)
Foam Adhesive Strips from Stampin'Up!
Simply Scored Scoring Tool from Stampin'Up! Circle Punch
Ruler Papercutter Scissors
Lined Paper
DIRECTIONS: *Please note your dimensions may be different depending on what size you print.Print Pastel Mauve Digital Kit to the size(s) you need.
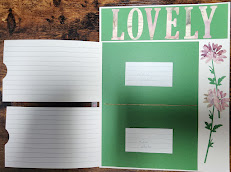
Page 1
Title Bar was cut 2-1/4" x 8-1/4" from Garden Green Cardstock.
Lovely was cut from Pastel Mauve Digital Kit Paper with Alphabet Dies and glued to Title Bar.
Cut 6-5/8" x 8-5/8" piece from Garden Green Cardstock.
Cut 2 - 4" x 7" pieces of cardstock printed from the Pastel Mauve Digital Kit.
Score each 4" x 7" pieces of cardstock at 1/2", fold, glue 1/2" side to the back of the 6-5/8" x 8-5/8"
piece of Garden Green Cardstock, one piece at the top and one piece at the bottom after gluing
lined paper to the back (second picture for Page 1). A 4" x 6" photograph will fit under each "flap."
Die cut two flowers from the Wildflower Die Set from Tim Holtz from Garden Green Cardstock and
two of the same flower from Pastel Mauve Digital Kit Papers. Trim the flower from the stem and
glue to the green flower.
Page 2
Title Bar was cut 2-1/4" x 8-1/4" from Garden Green Cardstock.
Memories was cut from Pastel Mauve Digital Kit Paper with Alphabet Dies and glued to Title Bar.
Cut 1-7/" x 8" from Garden Green Cardstock for the Belly Band; and,
Cut out 3 small prints from the Pastel Mauve Digital Kit and glue to Belly Band.
Cut two small pieces from Foam Adhesive Strip and attach to back of Belly Band, attach.
Cut 6" x 10-1/2" from Moody Mauve Cardstock, score at 3-1/2" and 7". Fold accordian style.
Fussy Cut desired image from Pastel Mauve Digital Kit and glue to front of accordian journal.
Fussy Cut second desired image from Pastel Mauve Digital Kit and partially glue to the inside of the
accordian journal (glue along the bottom, the middle and upper flowers) leaving space to insert
small journal cards. You have created two pockets on the inside.
Cut four to six small prints and insert into above pockets.
Cut 3" x 4" rectangle from Pastel Mauve Digital Kit for pocket. Score both sides and bottom at 1/4".
Fold along score lines. Using circle punch, punch "divit" on top edge of pocket.
Cut 1-7/8" x 5" rectangle from Garden Green Cardstock.
Cut 1-5/8" x 4-3/4" rectangle from Very Vanilla Cardstock, glue to Garden Green rectangle.
Cut 1-3/8" x 4-1/2" desired image from Pastel Mauve Digital Kit, layer on Very Vanilla Cardstock.
Cut 1-5/8" x 4-3/8" piece of lined paper and glue to back of tag.
Punch hole in tag and insert ribbon.
Cut 5-1/2" x 6-1/2" piece of lined paper and glue to back of accordian journal (last picture). Decorate
as you wish. Slip under belly band.
Cut 2 - 2-3/4" x 3-3/4" pieces of Garden Green Cardstock.
Cut 2 - 2-1/2" x 3-1/2" images from Pastel Mauve Digital Kit, cut out center using oval or rectangle
dies. Apply glue to the top, left side and bottom and attach to above rectangle, leaving right side
open to insert photograph.
Cut Foam Adhesive Strip to go around the sides and bottom of each Garden Green rectangle. Attach
to scrapbook page, leaving tops open to insert tickets or other ephemera you may have.
I will be giving away a set of pockets on June 2, 2024 to an individual that makes a comment. Please be sure when you leave a comment to include your e-mail address. Good Luck on winning!
Brenda


No comments:
Post a Comment